
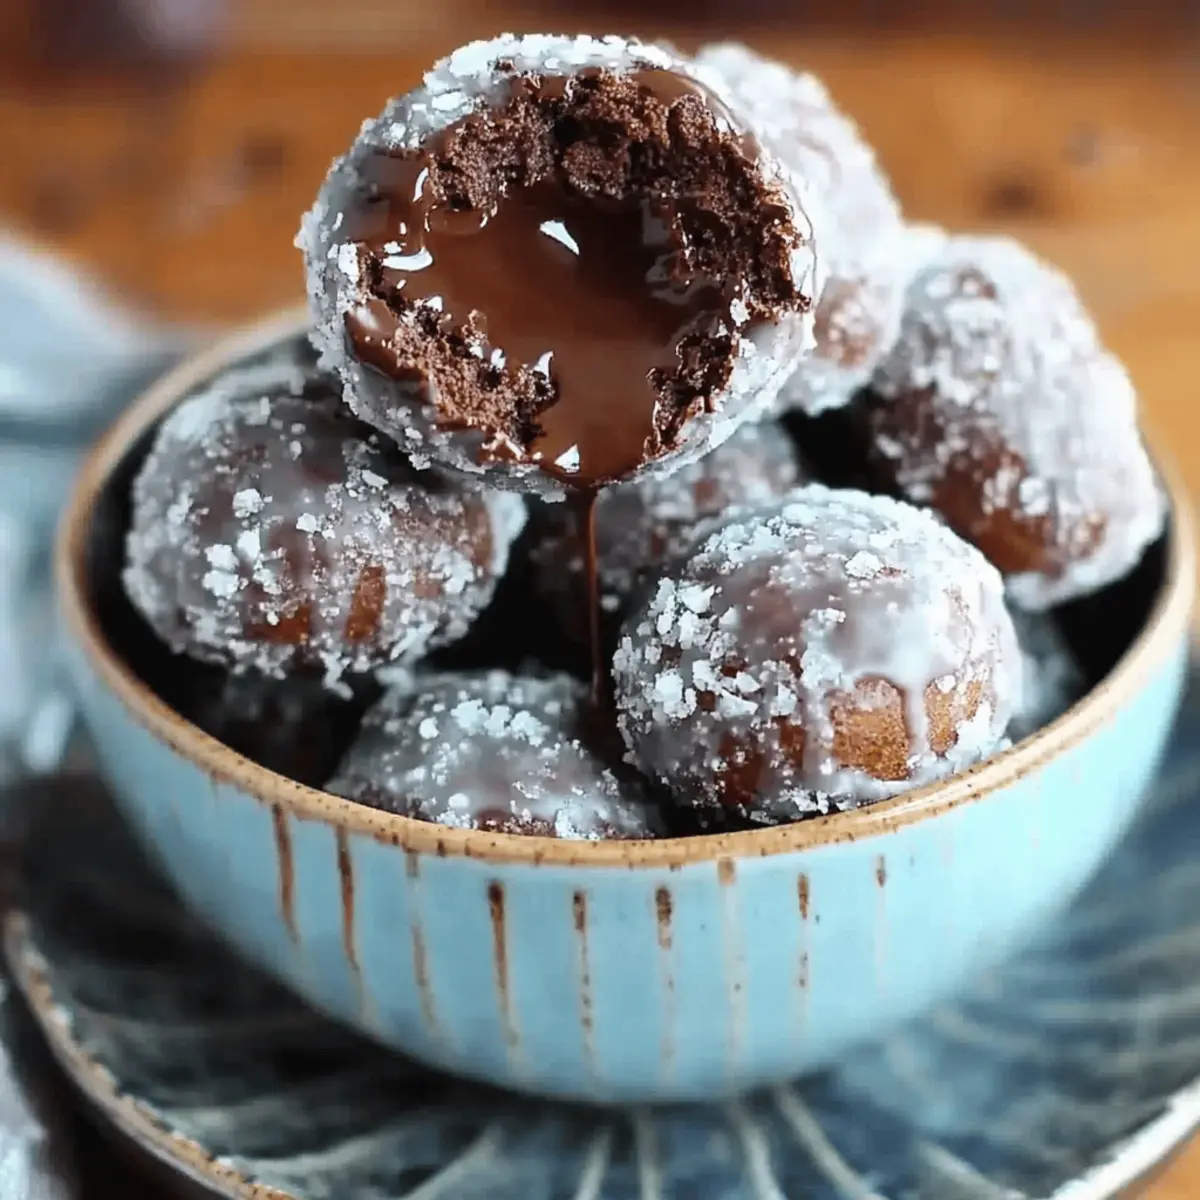
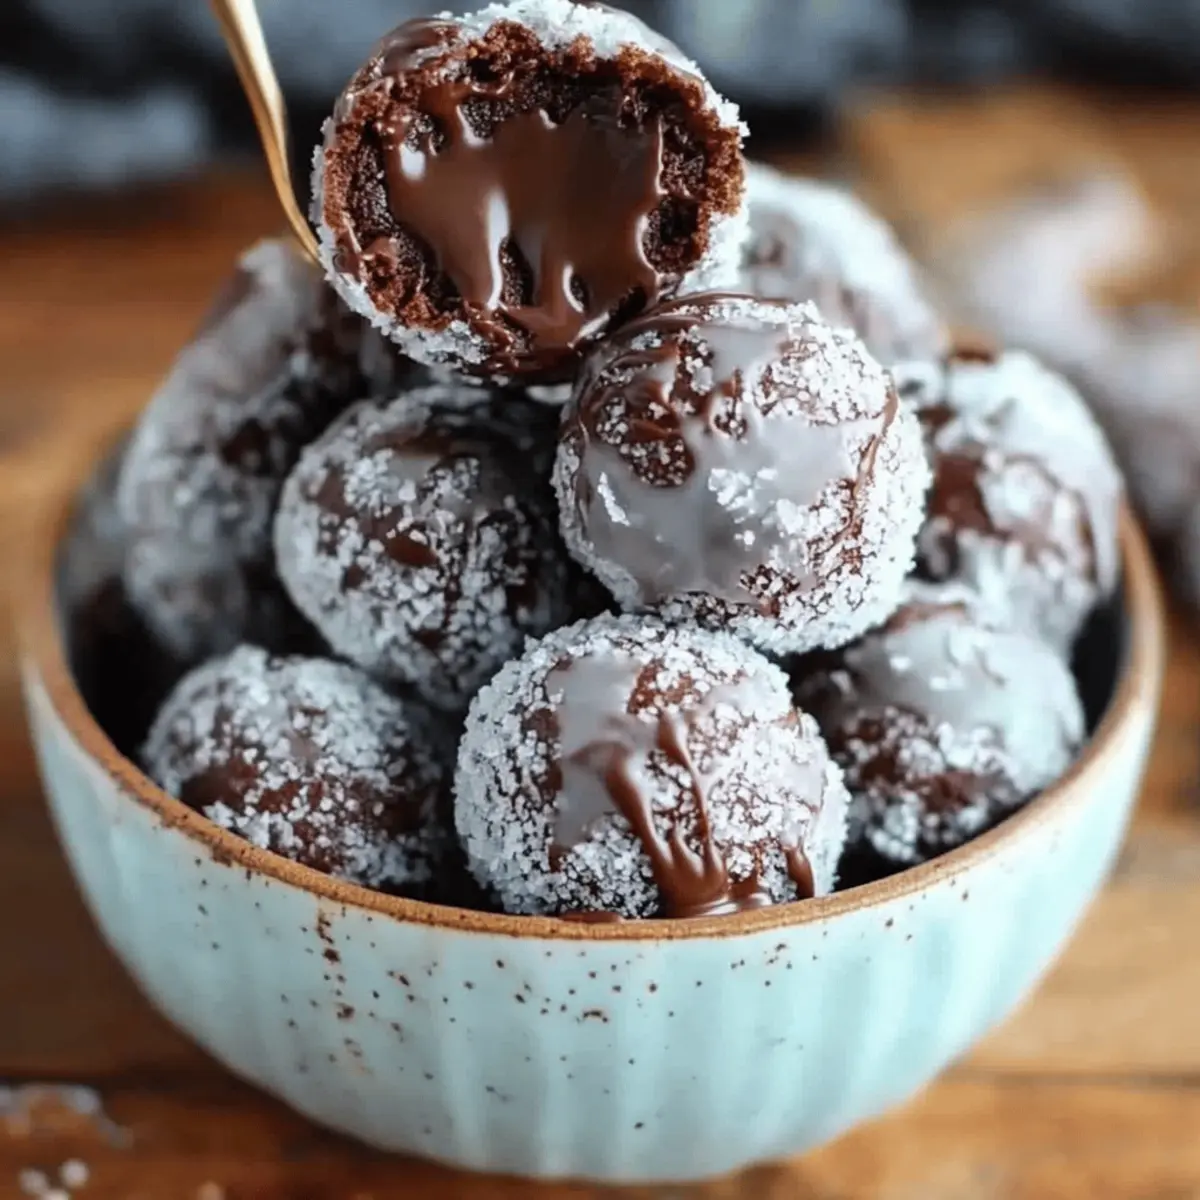
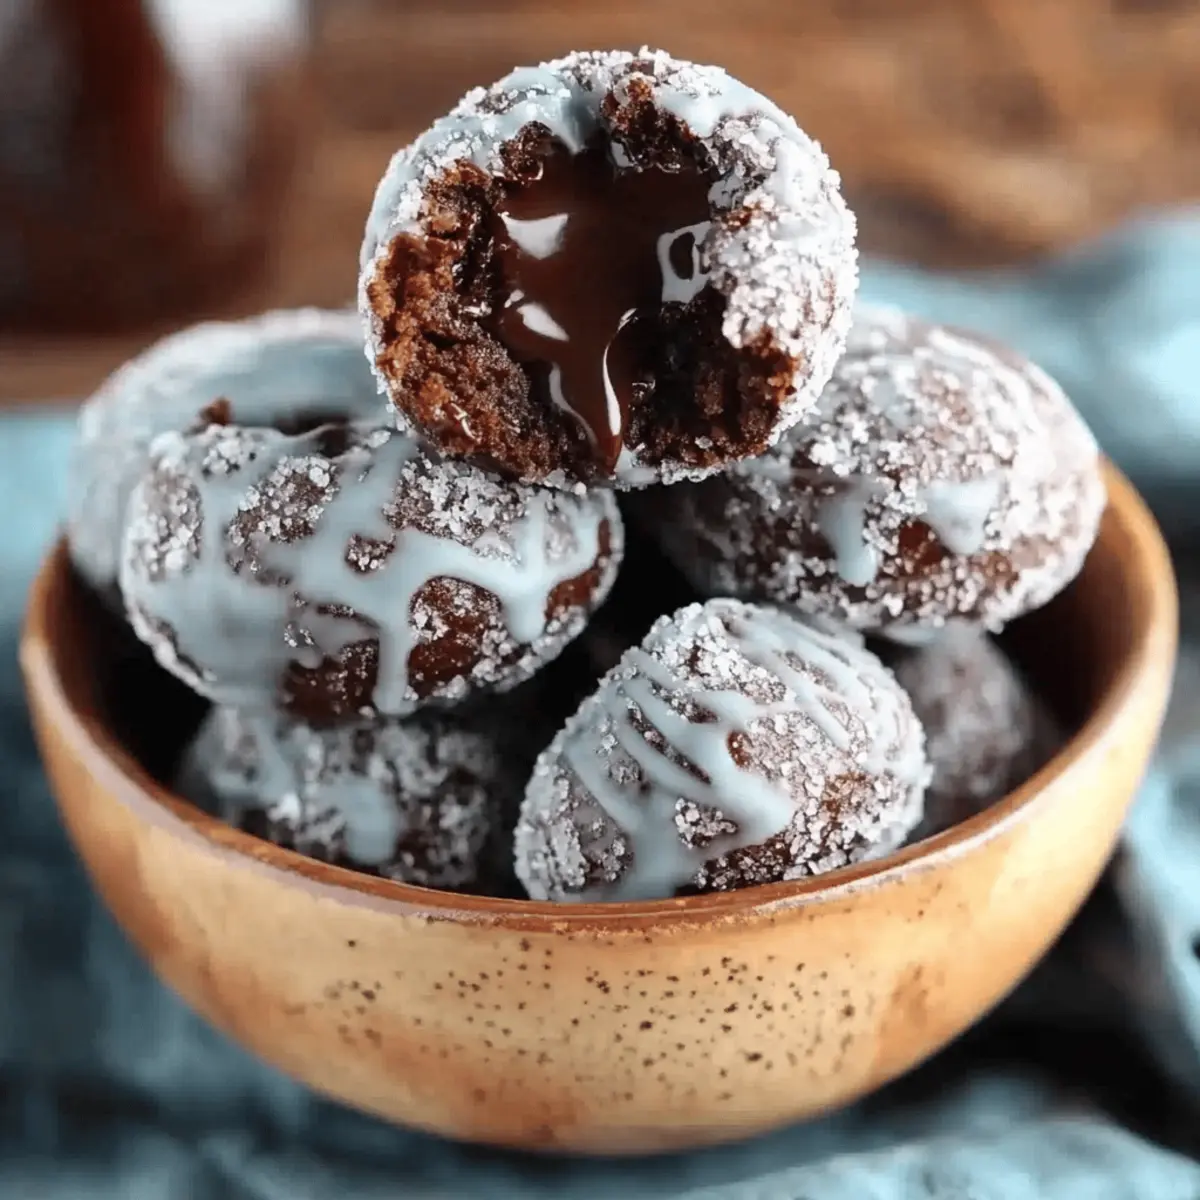
The moment the warm, chocolatey scent wafts through the kitchen, I know it's going to be a special day. There's something truly magical about Glazed Chocolate Donut Holes that transforms any ordinary morning into a delightful occasion. Not only are they a sweet escape for your taste buds, but these light and fluffy bites are also a breeze to whip up using everyday pantry staples. Perfect for breakfast, brunch, or a cozy dessert, this recipe promises to charm everyone at the table. Plus, with the option to customize your glaze or toppings, you're in for a creative baking adventure! What flavors will you dream up for your donut holes?
Why are Donut Holes a Must-Try?
Irresistible Decadence: Each bite of these Glazed Chocolate Donut Holes oozes with rich, chocolatey goodness that makes them truly delightful.
Quick and Easy: With simple steps and common ingredients, you'll have these bites of bliss ready in no time.
Perfect for Any Occasion: Whether it's a lazy Sunday breakfast or an entertaining dessert, they fit seamlessly into any gathering.
Customizable Treats: Feel free to experiment with toppings and glazes – think cinnamon sugar or a drizzle of white chocolate for unique flavors.
Loved by All: These donut holes are sure to be a hit with both kids and adults alike, making them a crowd-pleaser at every table.
Make Ahead Option: Enjoy hassle-free mornings by prepping them in advance; they can be frozen and reheated without losing that fluffy texture!
Glazed Chocolate Donut Holes Ingredients
For the Donut Holes
• All-purpose flour – Provides structure and texture; can use cake flour for a lighter texture.
• Granulated sugar – Sweetens the dough; brown sugar can be used for a richer flavor.
• Active dry yeast – Leavening agent that helps the dough rise; ensure yeast is fresh for proper activation.
• Salt – Enhances flavor; no substitutions necessary.
• Milk (lukewarm) – Hydrates the dough and activates yeast; non-dairy milk works as an alternative.
• Unsalted butter (melted) – Adds richness and flavor; substitute with coconut oil for a dairy-free option.
• Egg – Provides moisture and binds the ingredients; a flax egg or applesauce works for a vegan alternative.
• Vanilla extract – Enhances sweetness and adds flavor depth; use almond extract for a different flavor profile.
• Vegetable oil (for frying) – Used to fry the donut holes; can use canola oil or peanut oil as a substitute.
For the Chocolate Glaze
• Semi-sweet chocolate – Primary ingredient for the glaze; dark or milk chocolate can also be used.
• Unsalted butter (for glaze) – Adds creaminess to the chocolate glaze; no substitutions necessary.
• Milk (for glaze) – Helps smooth out the glaze; non-dairy milk is suitable.
• Powdered sugar – Sweetens and thickens the glaze; no substitutions necessary.
• Vanilla extract (for glaze) – Flavors the glaze; no substitutions necessary.
• Pinch of salt – Balances sweetness; no substitutions necessary.
Feel the joy as you gather these essentials to create your Glazed Chocolate Donut Holes—a delightful way to sweeten your day!
Step‑by‑Step Instructions for Glazed Chocolate Donut Holes
Step 1: Activate Yeast
In a small bowl, combine lukewarm milk (110°F), sugar, and active dry yeast. Stir gently and let the mixture sit for about 5-10 minutes, or until it becomes frothy on top. This step ensures your yeast is active and ready to work its magic, providing the rise for your delicious Glazed Chocolate Donut Holes.
Step 2: Mix Wet Ingredients
In a larger mixing bowl, add the melted unsalted butter, egg, and vanilla extract to the activated yeast mixture. Whisk everything together until smoothly combined, ensuring no lumps remain. This forms the flavorful, moist base for your donut holes, enhancing their soft texture with each blissful bite.
Step 3: Combine Dry Ingredients
In a separate bowl, sift together the all-purpose flour and salt. Gradually add this dry mixture to the wet ingredients, stirring gently with a wooden spoon or spatula until a soft dough forms. This step is crucial as it builds the structure of your donut holes, setting the foundation for that delightful texture.
Step 4: Knead Dough
Transfer the dough onto a lightly floured surface. Knead the dough for about 5-7 minutes using your hands or a stand mixer fitted with a dough hook. It should become smooth and elastic, indicating it’s ready for the first rise. This process develops the gluten, giving your Glazed Chocolate Donut Holes their wonderful chewyness.
Step 5: First Rise
Place the kneaded dough in a lightly oiled bowl, cover it with a clean kitchen towel, and set it in a warm place. Let it rise for 1 to 1.5 hours, or until it has doubled in size. This fermentation allows the flavors to develop and creates the light texture that makes these donut holes so irresistible.
Step 6: Shape Donuts
Once the dough has risen, punch it down gently to release air. Roll the dough out on a floured surface to about ½ inch thick. Use a cookie cutter or a sharp knife to cut out donut holes, then place them on a floured baking sheet, ensuring they have space to expand and breathe.
Step 7: Second Rise
Cover the baking sheet with a towel and let the shaped donut holes rise again for about 30-45 minutes, or until they become puffy. This second rise is equally vital and ensures your Glazed Chocolate Donut Holes achieve that soft, fluffy texture we all adore.
Step 8: Heat Oil
In a deep pot or fryer, pour enough vegetable oil to submerge the donut holes completely. Heat the oil to 350°F (175°C), using a thermometer to ensure it reaches the right temperature for frying. Maintaining this heat is essential for achieving that golden-brown color and delightful crunch in your donut holes.
Step 9: Fry Donut Holes
Carefully lower the donut holes into the hot oil in batches, frying them for about 1-2 minutes on each side until they are golden brown. Use a slotted spoon to remove them and place them on paper towels to drain excess oil. This step will create that picture-perfect, beautiful exterior.
Step 10: Prepare Glaze
While the donut holes are frying, set up a double boiler on the stove. Melt the semi-sweet chocolate and unsalted butter together, stirring until smooth and glossy. Once melted, mix in milk, vanilla extract, and a pinch of salt, creating a rich icing to drape over your warm Glazed Chocolate Donut Holes.
Step 11: Glaze Donut Holes
While the donut holes are still warm, dip each one into the chocolate glaze, allowing the excess to drip off before placing them back on a cooling rack. The heat from the donut holes ensures the glaze adheres perfectly, forming a beautiful, shiny finish that makes each bite utterly decadent.
Step 12: Set
Let the glazed donut holes sit on the rack for about 15-20 minutes, allowing the glaze to set properly. This step is essential; it creates a lovely sheen on your Glazed Chocolate Donut Holes, inviting everyone to enjoy your delightful homemade treats!

Expert Tips for Glazed Chocolate Donut Holes
- Yeast Matters: Always use fresh yeast for the best rise. If your yeast doesn’t foam during activation, discard it and start over.
- Optimal Dough: Avoid over-kneading; stop once the dough is smooth and elastic to ensure fluffy donut holes.
- Perfect Frying: Monitor oil temperature closely at 350°F—too hot will burn the donut holes, while too cool will make them greasy.
- Batch Frying: Fry donut holes in small batches to prevent overcrowding, which helps maintain the oil temperature for even cooking.
- Glazing Tips: Dip the warm donut holes in glaze immediately after frying to ensure the chocolate adheres beautifully, creating a delicious finish.
- Storage Health: Keep glazed donut holes at room temperature for up to 3 days in an airtight container, but they are truly best on the same day for freshness.
Make Ahead Options
These Glazed Chocolate Donut Holes are perfect for busy hosts who want to enjoy tasty treats without all the last-minute effort! You can prepare the dough up to 24 hours in advance by following the first five steps and then covering it tightly with plastic wrap before refrigerating. For optimal flavor, let the dough return to room temperature before shaping and frying. Additionally, the cooked donut holes can be stored in an airtight container for up to 3 days at room temperature or frozen for longer storage. When you're ready to enjoy them, simply reheat in the oven for a few minutes to bring back that fresh, fluffy texture. This way, your homemade treats will taste just as delicious as when they were first made!
What to Serve with Glazed Chocolate Donut Holes?
Each bite of these delicious donut holes deserves to shine, and pairing them with the right accompaniments enhances their sweet, chocolatey allure.
-
Fresh Berries: A medley of strawberries, blueberries, and raspberries provides a refreshing contrast to the rich donut holes, balancing sweetness with a burst of tartness.
-
Coffee: A warm cup of brewed coffee heightens the flavors and transforms your breakfast or brunch into a cozy café experience. The subtle bitterness pairs beautifully with the sweetness.
-
Vanilla Ice Cream: Serve these donut holes warm with a scoop of creamy vanilla ice cream for a decadent dessert experience. The melt-in-your-mouth chocolate glaze and lush ice cream create an irresistible combination.
-
Whipped Cream: A dollop of lightly sweetened whipped cream adds a fluffy texture and complements the chocolate, making each bite even more luxurious.
-
Nutella Drizzle: For an ultra-chocolatey finish, drizzle some Nutella over the glazed donut holes. It adds depth and a silky texture that chocolate lovers will adore!
-
Sparkling Lemonade: The zesty sparkle of lemonade refreshes the palate and enhances the experience, making it a delightful pairing during warm gatherings or festive brunches.
-
Coconut Milk: Serve alongside chilled coconut milk for a creamy, tropical twist that offers a refreshing balance to the sweet richness of the donut holes.
-
Chocolate Milk: For a truly indulgent treat, pair your donut holes with a cold glass of chocolate milk. It’s a nostalgic favorite that enhances the chocolatey goodness.
-
Cream Cheese Frosting: For the adventurous, a side of cream cheese frosting can take these donut holes to another level, creating a luscious dip that’s sweet and tangy, perfect for a fun brunch spread.
How to Store and Freeze Glazed Chocolate Donut Holes
Room Temperature: Keep donut holes in an airtight container at room temperature for up to 3 days to maintain their fluffy texture and delicious flavor.
Fridge: If you prefer, you can refrigerate them in an airtight container, but note that this may alter the texture slightly; consume within 3 days.
Freezer: For longer storage, freeze glazed donut holes in a single layer on a baking sheet, then transfer to a zip-top bag for up to 2 months.
Reheating: To enjoy them warm, reheat frozen donut holes in the oven at 350°F (175°C) for about 5-10 minutes for that freshly-made taste!
Glazed Chocolate Donut Holes Variations
Feel free to unleash your creativity with these variations and make each batch of donut holes uniquely yours!
-
Dairy-Free: Swap regular milk and butter for almond milk and coconut oil to whip up a delicious dairy-free delight.
-
Vegan Version: Replace the egg with a flax egg or ¼ cup of unsweetened applesauce for a plant-based alternative that’s equally tasty.
-
Cinnamon Sugar Bliss: After frying, roll the warm donut holes in cinnamon sugar for a sweet, aromatic treat that adds a delightful twist.
-
Fruit-Filled: Stuff the dough with a spoonful of jam or Nutella before frying for an ooey-gooey surprise inside with every bite.
-
Spicy Kick: Add a pinch of cayenne pepper to the chocolate glaze for a surprising hint of heat that contrasts beautifully with the sweetness.
-
Seasonal Flavors: Incorporate seasonal spices like pumpkin spice in the dough for a warm, cozy flavor that captures the essence of fall.
-
Nutty Delight: Mix chopped nuts, like pecans or almonds, into the dough for an added crunch that complements the soft, fluffy texture.
-
Irresistible Toppings: Drizzle with caramel sauce or sprinkle with toasted coconut for an enticing twist on your Glazed Chocolate Donut Holes.
Enjoy exploring these variations, and don’t forget to serve alongside some freshly brewed coffee or a glass of cold milk!
Glazed Chocolate Donut Holes Recipe FAQs
How do I choose the best ingredients for Glazed Chocolate Donut Holes?
Absolutely! For the all-purpose flour, you want it to be fresh and well-stored to ensure the best texture. I often recommend using bread flour for added chewiness; it really enhances that delightful donut hole experience! For the chocolate glaze, opt for semi-sweet chocolate for a balance of sweetness; if you're feeling adventurous, dark chocolate can take it to another level with a richer flavor.
What’s the best way to store leftover donut holes?
Very! Store your Glazed Chocolate Donut Holes in an airtight container at room temperature for up to 3 days. They tend to lose some freshness after that, but if you want them to last longer, freeze them instead. To keep them as fluffy as possible, place parchment paper in between layers before sealing them up tightly.
Can I freeze Glazed Chocolate Donut Holes?
Absolutely! To freeze your donut holes, arrange them in a single layer on a baking sheet and place them in the freezer until solid. This will prevent them from sticking together. After freezing, transfer them to a zip-top bag, and they’ll keep for up to 3 months. When you’re ready to enjoy them, just reheat in the oven at 350°F (175°C) for about 5-10 minutes!
What if my donut holes turn out dense or dry?
The more the merrier, and there are some tricks to ensure your donut holes remain fluffy! Make sure your yeast is fresh and properly activated—the foam on top is a good indicator. Additionally, over-kneading can lead to a tougher texture, so knead just until smooth and elastic. If they do turn out a bit dry, try soaking them in a little milk or chocolate sauce after frying; it can add some much-desired moisture!
Are there any dietary considerations I should keep in mind?
Of course! These Glazed Chocolate Donut Holes are vegetarian-friendly, but if you’re looking for vegan options, you can easily substitute the egg with a flax egg or applesauce, and use non-dairy milk and coconut oil instead of regular butter. Just be cautious about allergies, particularly with the use of eggs and dairy. For pets, it's best to keep these treats away from your furry friends since chocolate can be toxic to them.
Indulgent Glazed Chocolate Donut Holes that Melt in Your Mouth
Ingredients
Equipment
Method
- In a small bowl, combine lukewarm milk, sugar, and active dry yeast. Stir gently and let it sit for about 5-10 minutes, or until it becomes frothy.
- In a larger mixing bowl, combine melted unsalted butter, egg, and vanilla extract with the yeast mixture. Whisk until smoothly combined.
- Sift together the all-purpose flour and salt in a separate bowl. Gradually add this dry mixture to the wet ingredients, stirring gently until a soft dough forms.
- Transfer the dough to a lightly floured surface and knead for about 5-7 minutes until smooth and elastic.
- Place the kneaded dough in a lightly oiled bowl, cover with a towel, and let it rise in a warm place for 1 to 1.5 hours or until doubled in size.
- Punch the risen dough down gently, roll it out to about ½ inch thick, and cut out donut holes. Place them on a floured baking sheet.
- Cover the baking sheet with a towel and let the donut holes rise for another 30-45 minutes until puffy.
- Heat vegetable oil in a deep pot or fryer to 350°F. Ensure the oil reaches the right temperature for frying.
- Fry the donut holes in batches for 1-2 minutes on each side until golden brown, then place on paper towels to drain excess oil.
- Melt semi-sweet chocolate and unsalted butter in a double boiler until smooth. Stir in milk, vanilla extract, and a pinch of salt.
- Dip each warm donut hole into the chocolate glaze, allowing excess to drip off before placing on a cooling rack.
- Let the glazed donut holes sit on the rack for 15-20 minutes to set the glaze properly.


Leave a Reply