
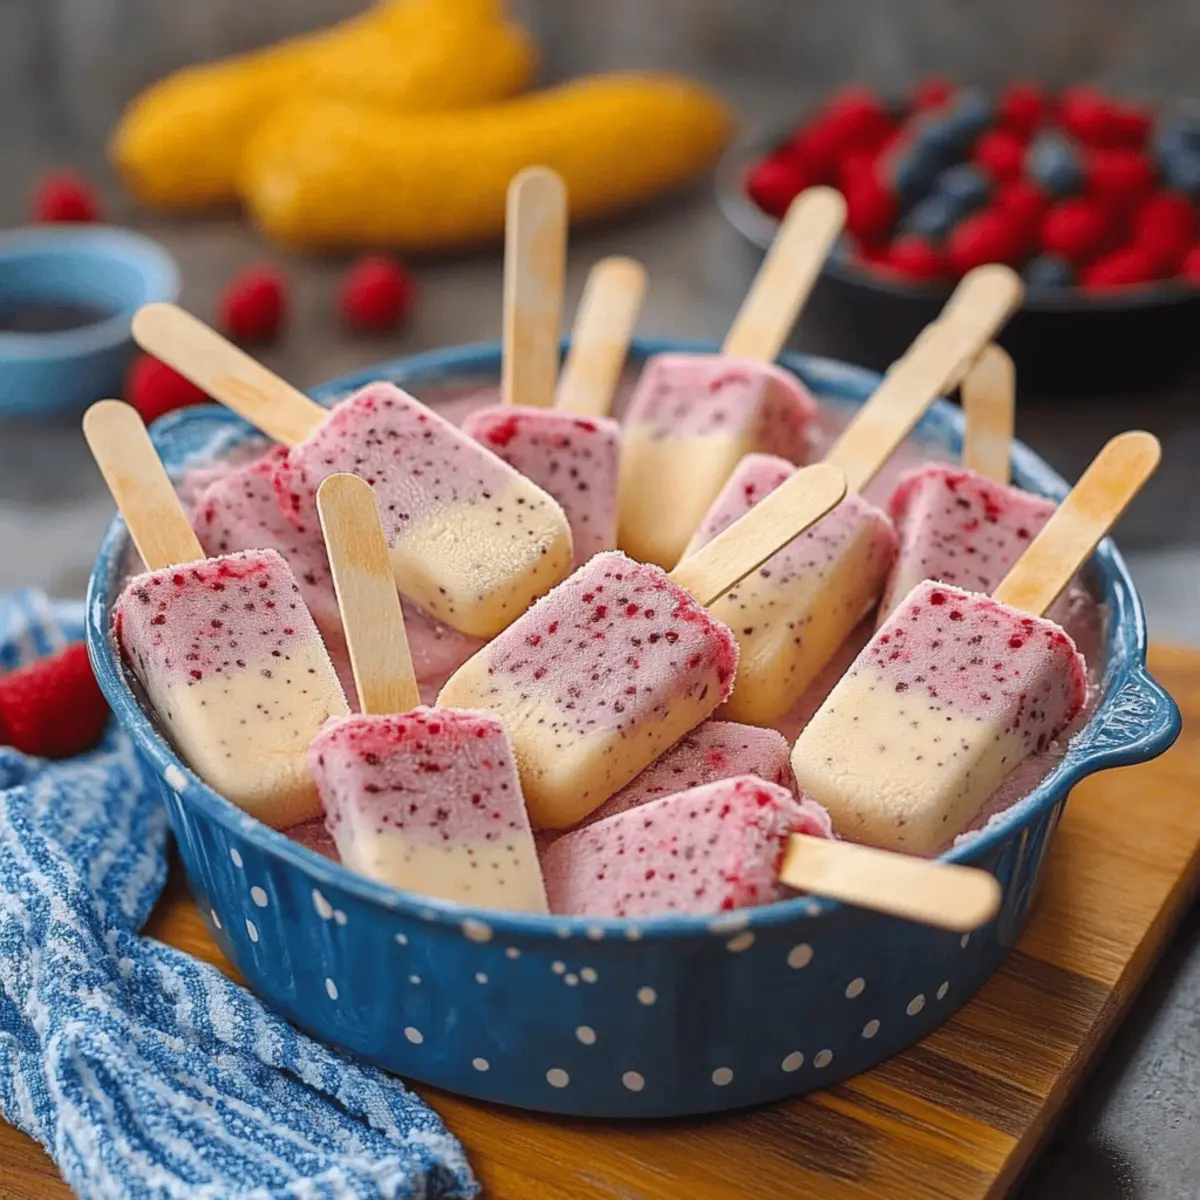
The aroma of summer wafts through the air as I pull out my trusty popsicle molds, ready to create something special. It's time to whip up some delightful Frozen Yogurt Pops that not only beat the heat but also keep us feeling good. These creamy treats are an indulgence you can feel proud of, offering a healthier alternative to store-bought ice creams, while being incredibly customizable. Whether you're a berry lover or have a soft spot for chocolate swirls, the options are endless! With just a handful of ingredients and minimal fuss, you can put together a guilt-free treat in no time—perfect for those hot afternoons when the kids (or adults!) are clamoring for a cool snack. So, what flavor combination will you try first?

Why Try Frozen Yogurt Pops?
Guilt-Free Indulgence: These pops are a delicious way to satisfy your sweet tooth without the guilt. Made with Greek yogurt, they’re packed with protein and perfect for a healthy snack.
Customizable Creations: Want something fruity? Go for berries or peaches! Craving chocolate? Add a swirl of cocoa. Your taste buds lead the way!
Quick and Easy: With just a few ingredients and simple steps, these treats come together in no time, making them an ideal project for a hot summer day.
Kid-Friendly Fun: Involve the little ones in creating their own flavor combinations, making snack time both delicious and entertaining.
Versatile Treats: Enjoy them as a cool breakfast option, a light dessert after dinner, or a revitalizing afternoon pick-me-up. More ideas can be found in our Serving Suggestions.
Frozen Yogurt Pops Ingredients
• Create delicious, customizable treats with these simple ingredients.
For the Base
- Greek Yogurt – A creamy base providing richness and a delightful tang; opt for full-fat for extra creaminess.
- Milk or Extra Yogurt – Use as needed to thin the mixture for easier pouring; adjust to achieve your desired consistency.
- Vanilla Extract – Adds aromatic depth to your pops; it's optional but enhances the flavor beautifully.
- Salt – A pinch balances sweetness and enhances overall flavor; don't skip it!
For the Sweetness
- Honey or Maple Syrup – Sweetens the pops and enhances flavor; you can adjust the amount to your taste or use sugar-free alternatives.
For the Fruit
- Fresh or Frozen Fruit – Provides natural sweetness and vibrant flavor; berries, mangoes, or peaches work wonderfully—pureeing some fruit creates a smoother texture.
Optional Toppings
- Granola, Chocolate Chips, Nuts, or Shredded Coconut – Add these for extra crunch and flavor variety; they’ll elevate your Frozen Yogurt Pops to the next level!
Step‑by‑Step Instructions for Frozen Yogurt Pops
Step 1: Prepare the Fruit
Start by washing and chopping your fresh fruit of choice or simply grab your frozen fruit. If you're using fresh fruit, aim for bite-sized pieces. For a smoother texture, consider pureeing half the fruit in a blender until creamy. This luscious blend will create a delightful swirl in your Frozen Yogurt Pops.
Step 2: Make the Yogurt Mixture
In a mixing bowl, combine Greek yogurt, your sweetener of choice (honey or maple syrup), and a splash of vanilla extract. Stir vigorously until the mixture is smooth and creamy. The goal is to eliminate any lumps, creating a rich base for your Frozen Yogurt Pops that balances tanginess and sweetness.
Step 3: Adjust Sweetness
Taste your yogurt mixture and adjust the sweetness as needed by adding more honey or maple syrup. If you prefer a sweeter treat, don't hesitate to add extra. This step ensures your Frozen Yogurt Pops are tailored to your palate, providing maximum enjoyment each time you take a bite.
Step 4: Thin the Mixture
If the yogurt mixture appears too thick for pouring, gradually add a splash of milk or extra yogurt until you reach the desired consistency. The mixture should be pourable but still hold its creamy texture. This adjustment is crucial for ensuring the blend pours smoothly into your molds.
Step 5: Add Salt
After thinning, stir in a pinch of salt into your yogurt mixture. This ingredient may seem small, but it enhances the overall flavor, balancing the sweetness and bringing out the yogurt's natural tanginess. A little salt goes a long way in making your Frozen Yogurt Pops truly delicious!
Step 6: Combine
Gently fold the prepared fruit into your yogurt mixture until they are evenly blended. Take care not to overmix; you want to see lovely pockets of fruit throughout your blend. This step ensures every bite of your Frozen Yogurt Pops bursts with flavor and freshness from the fruit.
Step 7: Fill Popsicle Molds
With your mixture ready, begin pouring it into popsicle molds. Fill each mold, leaving a little space at the top for expansion as they freeze. This step is where your Frozen Yogurt Pops start to take form, so make sure to fill them evenly for perfectly shaped treats!
Step 8: Add Toppings (optional)
If you'd like to elevate your Frozen Yogurt Pops, now is the time to sprinkle your selected toppings over the mixture. Granola, chocolate chips, or shredded coconut offer delightful crunch and flavor complexities. This fun addition will give your pops that extra flair for enjoyable snacking.
Step 9: Insert Sticks
Carefully place popsicle sticks into the center of each mold, pressing them down gently. Ensure they are centered and straight, so your Frozen Yogurt Pops have a sturdy handle once finished. This is an important step for easy and enjoyable eating later!
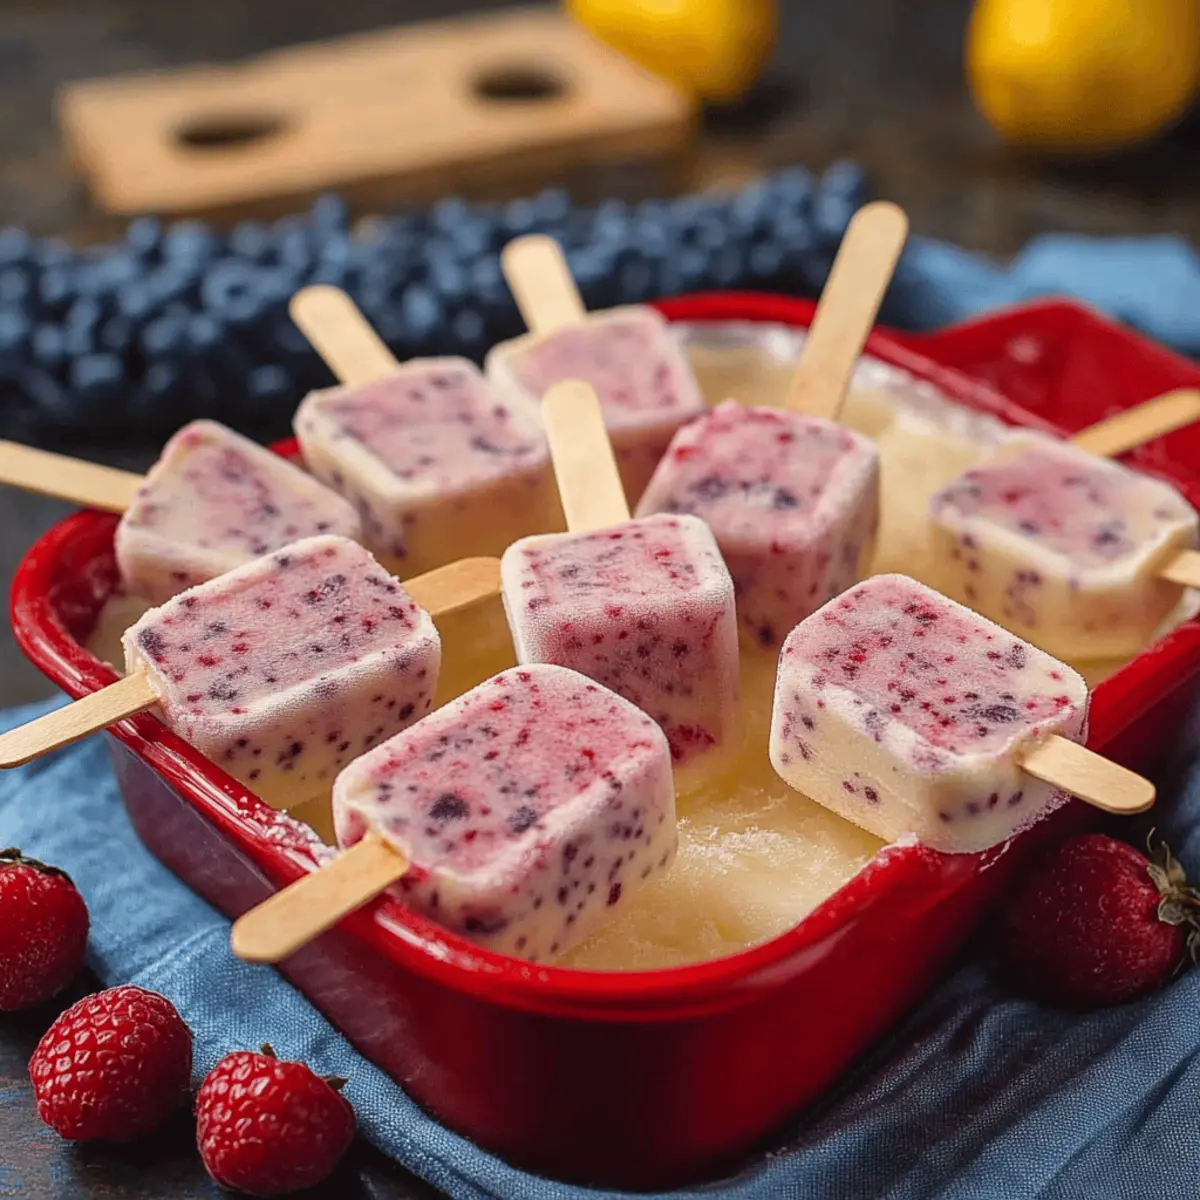
Step 10: Freeze
Transfer the filled molds into the freezer and allow them to freeze for at least 4-6 hours or overnight for optimal firmness. You’ll know your Frozen Yogurt Pops are ready when they're solid and firm to the touch. Patience pays off when it comes to creating the perfect pops.
Step 11: Remove from Molds
When you’re ready to enjoy your Frozen Yogurt Pops, run warm water briefly over the outside of the molds. This will help loosen the pops. Gently pull them out, taking care not to break them—your homemade treats should slide out easily and present beautifully!
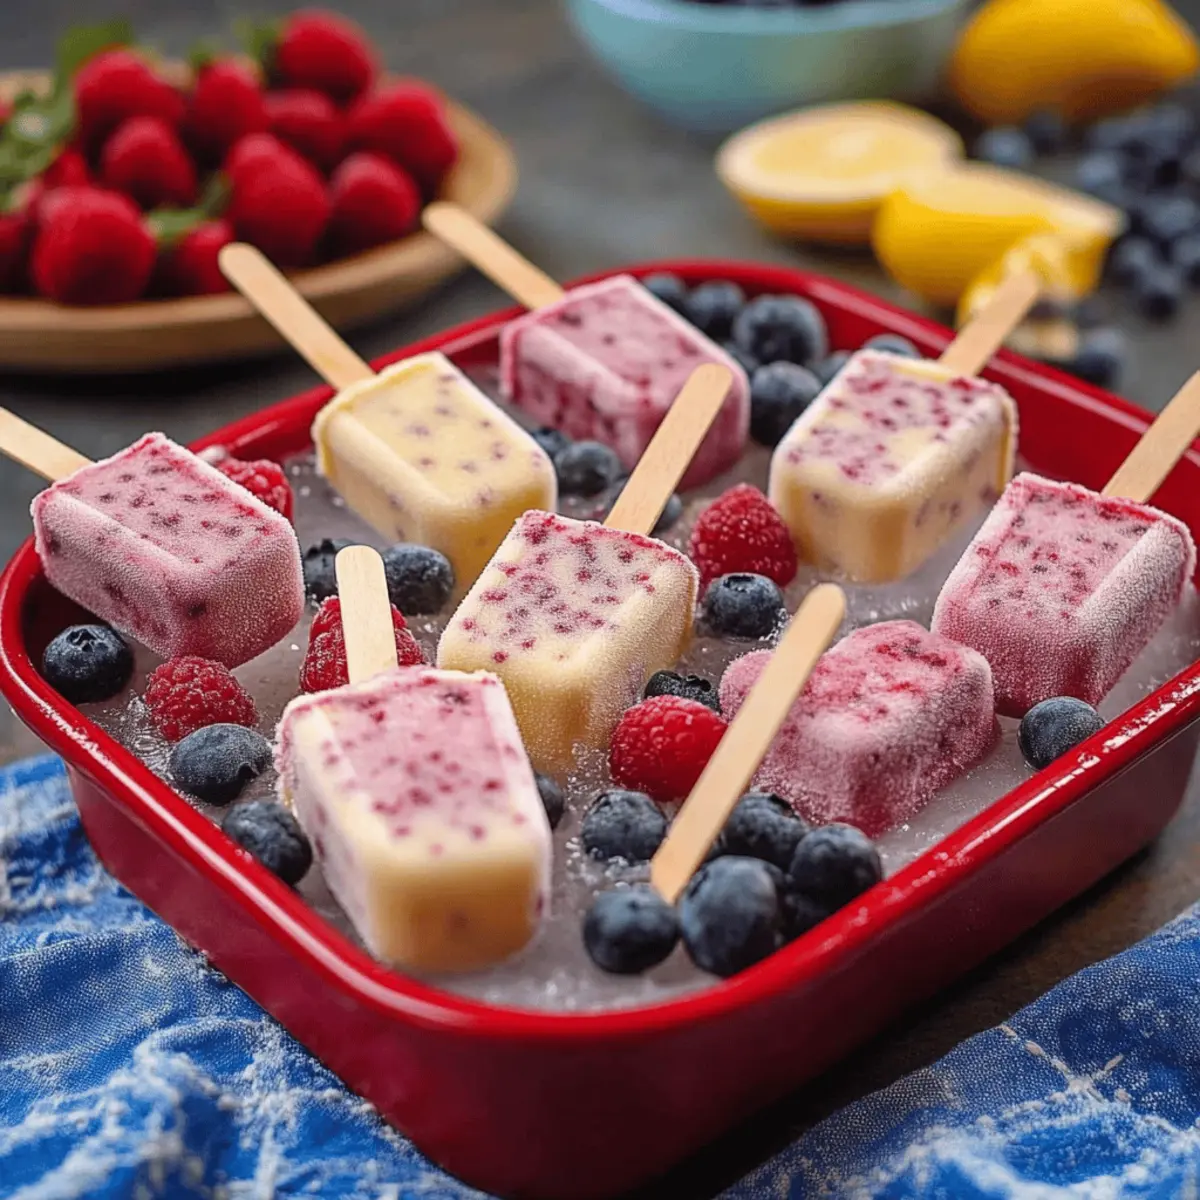
Step 12: Serve Immediately
Serve your Frozen Yogurt Pops immediately or store them individually wrapped in the freezer for later enjoyment. These pops are a perfect way to cool down and enjoy a healthy treat. Indulge in this refreshing delight anytime, and share the joy with family and friends!
Make Ahead Options
These Frozen Yogurt Pops are perfect for meal prep enthusiasts! You can prepare the yogurt mixture and fold in the fruit up to 24 hours in advance, storing it in the refrigerator to maintain flavor and freshness. Just be sure to cover the bowl tightly to prevent any browning of the fruit. When you're ready to enjoy, simply pour the mixture into molds, insert sticks, and freeze for 4-6 hours or overnight. This way, you'll have delicious, guilt-free treats ready to go whenever cravings strike, making your busy summer days a breeze! Enjoy them as a quick snack or a cooling dessert with minimal effort.
Expert Tips for Frozen Yogurt Pops
Choose the Right Yogurt: Use full-fat Greek yogurt for creaminess, or opt for non-fat if you're looking for a lighter treat. The yogurt is the star of your Frozen Yogurt Pops!
Avoid Overmixing: When combining the fruit and yogurt mixture, fold gently to preserve the lovely chunks of fruit, ensuring every bite bursts with flavor.
Use Silicone Molds: These make it much easier to remove your Frozen Yogurt Pops without breaking them. They're a great investment for any popsicle lover!
Adjust the Sweetness: Always taste your yogurt mixture before pouring into molds. A little extra honey or maple syrup can make a big difference in overall flavor.
Experiment with Flavors: Don’t hesitate to mix in unique ingredients like nut butter or espresso for a delicious twist. Your creativity can lead to refreshing new Frozen Yogurt Pops!
Frozen Yogurt Pops Variations
Feel free to sprinkle some creativity onto your frozen yogurt pops for a delightful twist that will surprise and please your palette!
-
Nut Butter Swirl: Mix in a dollop of your favorite nut butter for added creaminess and flavor. Peanut butter or almond butter brings a rich, nutty taste that perfectly complements the yogurt.
-
Chocolate Dip: After freezing, dip pops in melted dark chocolate and sprinkle with crushed nuts for a gourmet dessert. This indulgent twist screams special occasion!
-
Fruit Fusion: Combine multiple fruits like strawberries and bananas for a colorful, flavorful explosion. This variation makes every bite a fruity surprise!
-
Coffee Boost: Blend a shot of espresso into the yogurt mixture for an energizing wake-me-up treat. This adult-friendly pop is perfect for coffee lovers looking to cool down.
-
Plant-Based Alternative: Substitute Greek yogurt with coconut or almond milk yogurt to create a dairy-free version. It's just as delicious and perfect for vegan diets!
-
Spice It Up: Add a hint of cinnamon or a pinch of cayenne pepper for unexpected warmth and flavor. This subtle kick can be delightful!
-
Zesty Citrus: Incorporate zest from lemons or limes for a refreshing citrusy punch. The bright flavor elevates the pops and makes for a perfectly sunny treat!
-
Berry Blitz: Use a variety of berries for a mixed berry yogurt pop. Blueberries and raspberries not only add vibrant color but also provide a burst of sweetness with every bite!
Let your imagination run wild—each twist can bring new excitement to your frozen yogurt pops any time you’re ready to chill! Check out our Serving Suggestions for ideas on how to enjoy your creations, and don’t forget, fun toppings can elevate your pops even further!
How to Store and Freeze Frozen Yogurt Pops
- Freezer: Store your Frozen Yogurt Pops in an airtight container or individually wrapped in plastic wrap for up to 2-3 months. This will help preserve their delicious flavor and texture.
- Reheating: When ready to enjoy, simply remove them from the freezer, run some warm water over the molds to loosen, and gently pull out. No need for additional heating!
- Room Temperature: Avoid leaving the pops at room temperature for more than 10-15 minutes, as they can quickly melt and become difficult to handle.
- Serving: If you're serving them for a gathering, consider taking them out shortly before serving, allowing for just a bit of softening for easier handling. Enjoy your delightful pops!
What to Serve with Frozen Yogurt Pops
Create the perfect summer spread alongside these refreshing treats that will keep everyone smiling.
-
Fresh Fruit Salad: A colorful medley of seasonal fruits enhances the pops' fruity flavors and adds a refreshing crunch. Perfect for brightening up your dessert table!
-
Granola Parfait: Layer creamy yogurt and granola for a delightful contrast in textures, making for a wholesome breakfast option paired with your Frozen Yogurt Pops.
-
Savory Cheese Platter: Serve with a selection of cheeses and crackers to create a beautiful balance of sweet and salty—perfect for summer gatherings or picnics.
-
Iced Tea or Lemonade: Quench your thirst with icy beverages that complement the cooling nature of these pops. Flavored teas or citrusy lemonade make for a perfect pairing!
-
Chocolate Dipped Pretzels: The sweet-salty blend of these crunchy snacks adds a satisfying crunch alongside your delicious pops. They promise a delightful treat for all ages!
-
Coconut Chia Pudding: This creamy, nutty pudding offers a unique twist to your dessert experience and pairs wonderfully with the tangy Frozen Yogurt Pops. A nutritious delight worth trying!
-
Summer Sorbet: For more fruity bliss, serve with refreshing sorbet to keep the flavors cohesive and add more icy texture to your dessert spread!
Frozen Yogurt Pops Recipe FAQs
How do I know if my fruit is ripe enough for the pops?
Absolutely! Look for fresh fruit that is bright and aromatic. Berries should be plump without dark spots all over; peaches should yield slightly to pressure. If using frozen fruit, ensure it’s free from ice crystals and has a uniform color.
What is the best way to store my Frozen Yogurt Pops?
For optimal freshness, store your Frozen Yogurt Pops individually wrapped in plastic wrap or in an airtight container in the freezer. They will maintain their delicious flavor and texture for up to 2-3 months. Just make sure they are airtight to prevent freezer burn!
Can I freeze my yogurt mixture before adding fruit?
Yes! If you prefer a pre-made yogurt base, freeze the yogurt mixture in molds for 1-2 hours until slightly firm, then add your fruit on top and continue freezing until solid. This method creates delicious layers of flavor in your pops!
What should I do if my pops are hard to remove from the molds?
Very! If your Frozen Yogurt Pops are stuck, simply run warm water over the outside of the molds for about 10-15 seconds. This helps loosen the pops without melting them too much. Gently pull them out and enjoy!
Are these pops suitable for kids with allergies?
Always check each ingredient label to ensure your Frozen Yogurt Pops are allergy-friendly. For dairy-free options, you can substitute Greek yogurt with plant-based yogurt. If using sweeteners, ensure they don’t contain any allergens relevant to your children.
Can I use alternative sweeteners for a lower-sugar option?
Definitely! For a lower-sugar version, consider stevia or monk fruit sweetener as alternatives to honey or maple syrup. Start with half the recommended amount and adjust to your taste, keeping in mind that different sweeteners can have varying sweetness levels.
Indulgent Frozen Yogurt Pops: Your Summer Chill Treat
Ingredients
Equipment
Method
- Wash and chop fresh fruit or use frozen fruit. Puree half the fruit if a smoother texture is desired.
- In a mixing bowl, mix Greek yogurt, sweetener, and vanilla extract until smooth and creamy.
- Taste the mixture and adjust sweetness by adding more honey or maple syrup if desired.
- If too thick, gradually add milk or extra yogurt until pourable but creamy.
- Stir in a pinch of salt to balance the sweetness and enhance flavor.
- Gently fold in the prepared fruit to the yogurt mixture.
- Pour the mixture into popsicle molds, leaving space at the top for expansion.
- Add optional toppings if desired.
- Insert popsicle sticks into each mold.
- Freeze for at least 4-6 hours or overnight until solid.
- Run warm water over molds to loosen pops before removing.
- Serve immediately or store in the freezer for later enjoyment.


Leave a Reply