
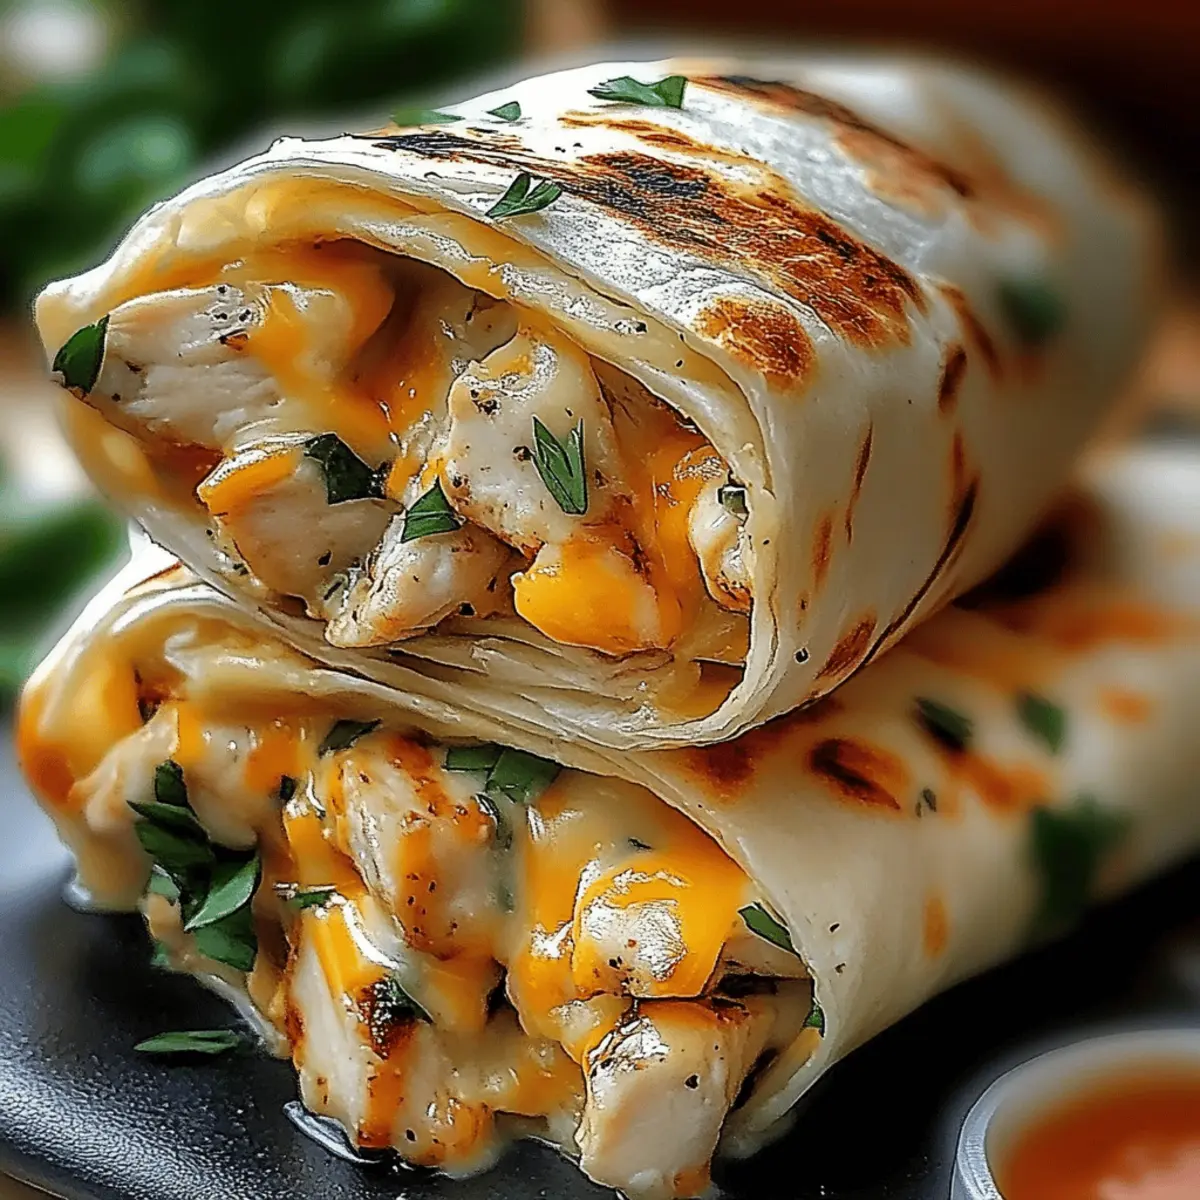
As I rifled through my fridge on a busy evening, the mystery of leftover chicken called out to me—an unsung hero waiting for its time to shine. That’s when I whipped up these Cheesy Garlic Chicken Wraps, an irresistible blend of quick, easy cooking and customizable comfort. Not only do they transform leftover chicken into a delightful meal, but their gooey cheese and rich garlic sauce take this simple dish to new heights. With a minimal prep time and the ability to cater to everyone’s tastes with various cheeses and toppings, they’re perfect for any night when a satisfying meal is just a wrap away. Curious how to make them your own? Let’s dive into this delicious recipe!

Why Are Cheesy Garlic Chicken Wraps a Must-Try?
Quick and Easy: With minimal prep and cook time, you can whip these up in no time, making them ideal for busy weeknights.
Gooey Goodness: The combination of melted mozzarella and cheddar gives you that stretchy, cheesy satisfaction everyone craves.
Customizable Delight: Feel free to mix and match toppings or substitute cheeses to cater to your family's preferences. Want a spicy kick? Just swap cheddar for pepper jack!
Use Leftovers Wisely: Transform leftover chicken into a mouthwatering meal that minimizes waste and maximizes flavor—perfect for creativity in the kitchen!
Crowd-Pleaser: Whether it’s a family dinner or a casual get-together, these wraps are sure to impress and satisfy everyone at the table. Plus, they pair wonderfully with crispy sweet potato fries or a refreshing garden salad!
Cheesy Garlic Chicken Wraps Ingredients
For the Chicken
• Chicken Breast – Provides protein; you can use precooked chicken for easy prep.
• Olive Oil – Adds moisture for a juicy finish; any oil will do if you're out.
• Garlic Powder – Infuses a robust garlic flavor; fresh minced garlic can be substituted.
• Onion Powder – Deepens the overall taste; consider fresh onion for a different profile.
• Paprika – Adds a pop of color and hints of sweetness; smoked paprika brings an extra layer.
• Black Pepper/Salt – Essential for seasoning; adjust to your taste preference.
For the Sauce
• Mayonnaise – Acts as a creamy base for the garlic sauce; swap for Greek yogurt for a lighter version.
• Minced Garlic – Freshness is key; ensure it's finely minced for even distribution.
• Parmesan Cheese – Elevates the sauce with a savory kick; substitute with any hard cheese if desired.
• Lemon Juice – Brightens flavors and balances richness; vinegar can work in a pinch.
• Dried Parsley – Adds a touch of herbaceous freshness; fresh herbs are always a delightful option.
For the Wrap
• Flour Tortillas – Perfect foundation for the wraps; consider gluten-free tortillas for dietary needs.
• Shredded Mozzarella & Cheddar Cheese – Delivers that gooey melted goodness everyone loves; switch up your cheese selection based on preference.
Optional Toppings
• Cilantro – Adds freshness and color; feel free to skip if you're not a fan.
• Red Onion – Provides a sharp crunch; can use fresh onion slices for added zest.
• Tomatoes – Enhances taste and texture; choose cherry or diced, based on your preference.
There you have it! With these ingredients, you're all set to create your Cheesy Garlic Chicken Wraps. Get ready to indulge in a warm and satisfying meal that’s bound to become a household favorite!
Step‑by‑Step Instructions for Cheesy Garlic Chicken Wraps
Step 1: Prepare Chicken
Start by taking your chicken breasts and using a meat mallet to pound them to an even thickness of about 1 inch. This ensures that they cook evenly and stay juicy. Once prepared, set them aside while you gather your spices for seasoning.
Step 2: Season Chicken
In a small bowl, mix together garlic powder, onion powder, paprika, salt, and pepper. Generously rub this flavor-packed mixture over the chicken breasts to coat them well. This will infuse the chicken with delicious flavor, getting you ready to create your Cheesy Garlic Chicken Wraps.
Step 3: Cook Chicken
Heat 2 tablespoons of olive oil in a non-stick skillet over medium heat. Once the oil glistens, add the seasoned chicken breasts and cook for about 5-7 minutes on each side, or until they reach an internal temperature of 165°F (74°C). The chicken should be golden brown and cooked through, releasing a wonderful aroma.
Step 4: Rest & Shred Chicken
Once cooked, transfer the chicken to a cutting board and let it rest for 5 minutes. This resting period allows the juices to redistribute, keeping the meat moist. After resting, use two forks to shred the chicken into bite-sized pieces, ready for the wraps.
Step 5: Make Garlic Sauce
In a mixing bowl, whisk together mayonnaise, minced garlic, grated Parmesan cheese, lemon juice, dried parsley, and a pinch of black pepper. This creamy garlic sauce will be rich and flavorful, perfect for blending with the shredded chicken in your Cheesy Garlic Chicken Wraps.
Step 6: Prepare Tortillas
If desired, warm your flour tortillas in a skillet over low heat for about 30 seconds on each side, or until pliable. Warming them will make assembling and folding easier, ensuring that your wraps have the perfect texture when filled.
Step 7: Assemble Wraps
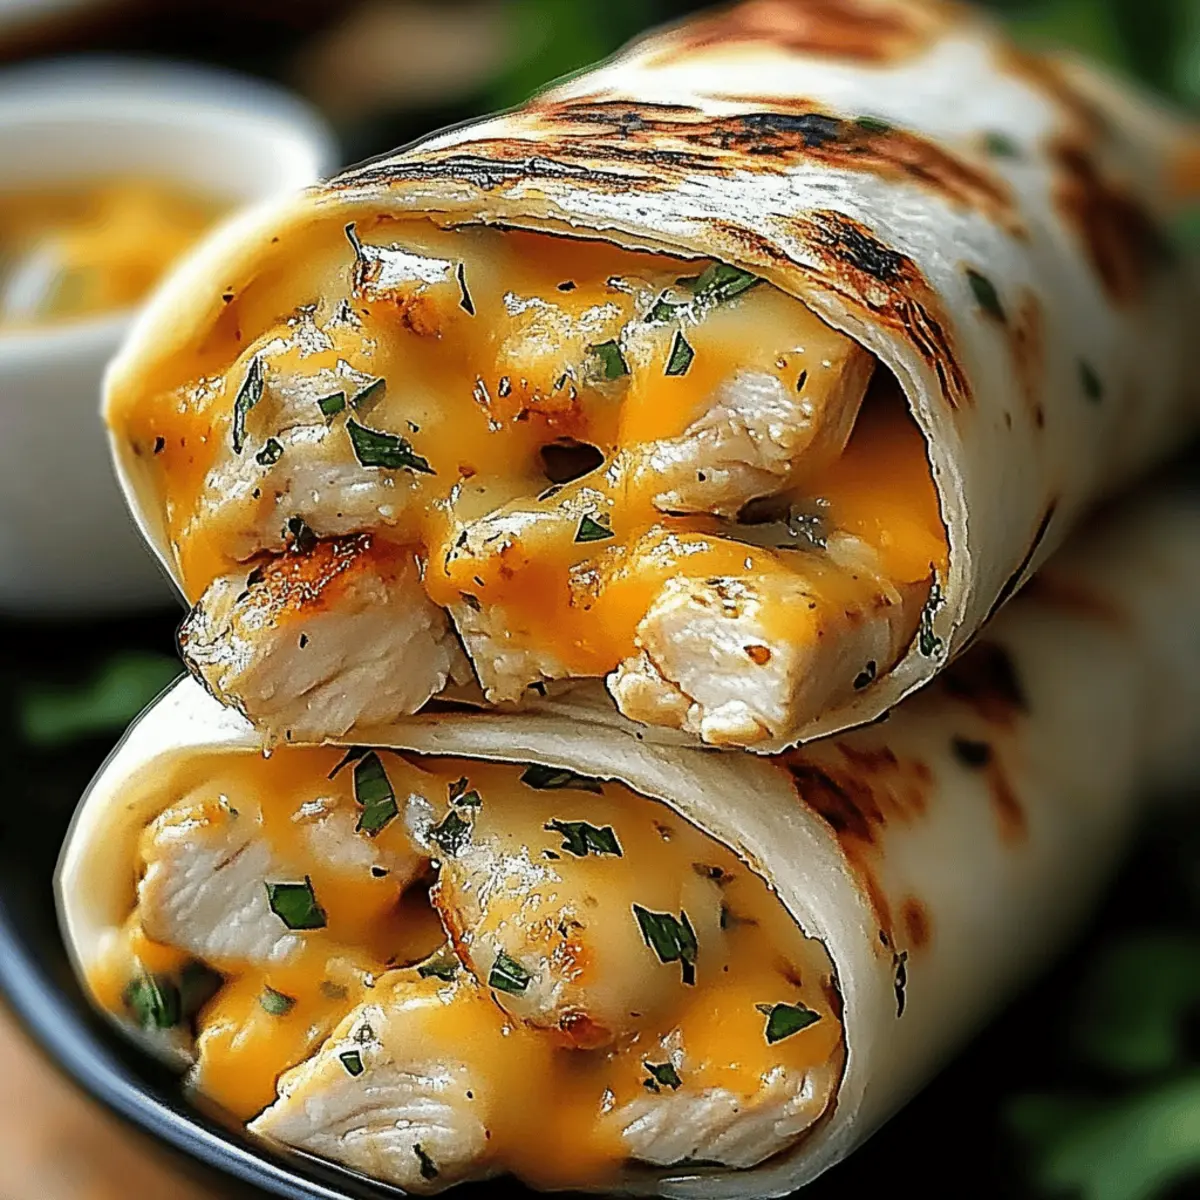
Spread a generous layer of the garlic sauce over the center of each tortilla. Top it with a portion of shredded chicken and a handful of shredded mozzarella and cheddar cheese. The gooey cheesiness will melt perfectly during cooking, complementing the flavors of the garlic sauce.
Step 8: Add Optional Toppings
Feel free to sprinkle additional toppings like fresh cilantro, red onion slices, or diced tomatoes over the chicken and cheese. This personal touch adds color and enhances texture, making your Cheesy Garlic Chicken Wraps even more delightful.
Step 9: Fold and Roll
To wrap, tuck the sides of the tortilla over the filling, then roll it tightly from the bottom up. Ensure the ingredients are secure inside as you roll, creating a compact wrap that holds all the delicious flavors together.
Step 10: Cook Wraps
In the same skillet, place the wraps seam-side down and sauté for about 3-4 minutes on each side, or until the tortillas are golden brown and crispy, and the cheese has melted. Press down gently with a spatula for that perfect crunch.
Step 11: Serve
Once cooked to perfection, remove the wraps from the skillet and let them rest for a minute. Slice each wrap in half and serve them warm, showcasing the mesmerizing layers of cheesy goodness and garlic flavor waiting to be enjoyed.

Expert Tips for Cheesy Garlic Chicken Wraps
- Chicken Care: Ensure not to overcook the chicken; it should be tender and juicy for the best Cheesy Garlic Chicken Wraps flavor.
- Resting Time: Allow the chicken to rest for at least 5 minutes before shredding to let the juices redistribute for maximum moisture.
- Crispy Texture: For beautifully crispy wraps, use gentle pressure with a spatula while cooking to help achieve that golden brown exterior.
- Experiment with Cheese: Don't hesitate to swap out cheeses; adding a spicy twist with pepper jack can elevate your wraps to the next level!
- Toppings Galore: Mix and match optional toppings like cilantro or tomatoes to personalize your wraps and create delightful flavor combinations.
- Store Wisely: If you have leftovers, refrigerate them for up to 3 days and reheat in a skillet to maintain the crispiness of the wrap.
Cheesy Garlic Chicken Wraps: Variations & Substitutions
Feel free to make these Cheesy Garlic Chicken Wraps uniquely yours with these simple and delicious variations!
-
Spicy Twist: Substitute cheddar with pepper jack cheese for a delightful kick that will awaken your taste buds.
-
Mushroom Medley: Add sautéed mushrooms and onions to the filling for a savory earthiness that complements the chicken beautifully. Their umami flavors elevate each bite!
-
Low-Carb Option: Use large lettuce leaves instead of tortillas for a light, refreshing wrap that’s perfect for a healthier meal without sacrificing flavor.
-
Veggie Boost: Introduce grilled or roasted veggies like zucchini and bell peppers for added nutrition, bringing a rainbow of flavors to your wraps. It's a great way to sneak in those extra servings of veggies!
-
Creamy Alternative: Swap mayonnaise for a creamy avocado spread to add richness and a fresh twist—perfect for fans of avocados!
-
Herb-Infused: Replace dried parsley with fresh herbs like basil or cilantro for a burst of freshness that brightens the entire dish.
-
Cheese Variety: Experiment with different cheese blends, such as gouda or feta, for unique flavor profiles that make your wraps even more exciting.
-
Heat Level: Add a pinch of cayenne pepper to the garlic sauce for an extra layer of heat that will spice things up beautifully.
With these variations, you’re not just making a meal; you’re creating a culinary adventure that’s perfect for any palate! Don't forget to pair your wraps with crispy sweet potato fries or a bright garden salad for a delightful dining experience. Enjoy!
Make Ahead Options
These Cheesy Garlic Chicken Wraps are perfect for meal prep enthusiasts looking to save time during busy weeknights! You can prepare the chicken and garlic sauce up to 24 hours in advance; simply cook and shred the chicken, then combine it with the sauce and refrigerate in an airtight container. To maintain quality, keep the tortillas separate to prevent sogginess. When you’re ready to serve, warm the tortillas briefly and assemble the wraps with the filling, topped with your favorite ingredients. Sauté the wraps until golden and crispy for delicious results, making dinner a breeze with minimal effort.
What to Serve with Cheesy Garlic Chicken Wraps
These delightful wraps are the perfect centerpiece for any gathering or cozy family dinner. Let’s explore the best accompaniments that will elevate your meal experience!
-
Crispy Sweet Potato Fries: Their contrasting sweetness and crunch pair beautifully with the savory wraps, creating a delightful textural balance.
-
Garden Salad: A light and refreshing salad adds brightness to your meal, with fresh veggies complementing the rich flavors of the wraps.
-
Roasted Vegetables: Roasting brings out the natural sweetness of veggies, making them a tasty side that enhances the overall dish with color and nutrition.
-
Creamy Coleslaw: The creamy tang of coleslaw provides a lovely crunch that cuts through the richness of the cheesy wraps, making each bite more satisfying.
-
Guacamole: Smooth and buttery, guacamole offers a creamy texture that adds an extra layer of richness while harmonizing with the garlic flavors.
-
Mango Salsa: The brightness of fresh mango salsa brings a zesty flair to your meal, with tropical notes that contrast wonderfully with the savory chicken.
-
Iced Lemonade: This refreshing drink is the perfect thirst-quencher, offering a tart contrast that helps cleanse your palate between bites.
-
Chocolate Chip Cookies: End your meal on a sweet note with warm cookies that keep the comfort food theme intact, leaving everyone with smiles!
How to Store and Freeze Cheesy Garlic Chicken Wraps
-
Fridge: Store leftovers in an airtight container for up to 3 days. This way, your Cheesy Garlic Chicken Wraps remain fresh and ready for a quick meal.
-
Freezer: To freeze, wrap individual wraps tightly in plastic wrap, then place them in a freezer bag. They can be frozen for up to 2 months for future quick lunches or dinners.
-
Reheating: For best results, reheat wraps in a skillet over medium heat until crispy, about 3-4 minutes on each side. This way, you’ll maintain that delicious texture!
-
Thawing: If frozen, thaw the wraps overnight in the fridge before reheating to make sure they warm evenly.
Cheesy Garlic Chicken Wraps Recipe FAQs
What is the best way to select chicken for the wraps?
Absolutely! When selecting chicken for your Cheesy Garlic Chicken Wraps, choose breasts that feel firm and are free of any dark spots or unpleasant odors. If you're short on time, using pre-cooked or rotisserie chicken is a fantastic shortcut that retains delicious flavor.
How should I store leftover Cheesy Garlic Chicken Wraps?
To store your leftovers, wrap the Cheesy Garlic Chicken Wraps tightly in plastic wrap or place them in an airtight container. They will stay fresh in the refrigerator for up to 3 days. Just reheat them in a skillet over medium heat for about 3-4 minutes on each side to retain their crispy texture!
Can I freeze Cheesy Garlic Chicken Wraps?
Absolutely! To freeze, wrap each Cheesy Garlic Chicken Wrap tightly in plastic wrap, then place them in a freezer bag for up to 2 months. When you're ready to enjoy them, thaw the wraps overnight in the refrigerator before reheating them in a skillet to get that delightful crispiness back.
What can I do if my chicken is overcooked?
If your chicken turns out overcooked and dry, fear not! You can shred the chicken and mix it back into the garlic sauce, adding a splash of chicken broth or even a bit more mayo to moisten it up. This will help revitalize the chicken for your wraps.
Are there any dietary considerations I should keep in mind for these wraps?
Certainly! For gluten-free options, choose gluten-free tortillas, and if dairy is a concern, you can substitute cheeses with dairy-free alternatives. Always check labels for allergens if serving to guests or family members with specific dietary needs.
Can I use frozen chicken for these wraps?
Yes, you can use frozen chicken, but it’s important to thaw it thoroughly before cooking. The best method is to place the frozen chicken in the refrigerator overnight or use the defrost setting on your microwave. This step ensures your chicken cooks evenly and safely when you prepare your Cheesy Garlic Chicken Wraps.
Irresistibly Cheesy Garlic Chicken Wraps You’ll Love
Ingredients
Equipment
Method
- Start by taking your chicken breasts and pound them to an even thickness of about 1 inch.
- In a small bowl, mix together garlic powder, onion powder, paprika, salt, and pepper. Rub this mixture over the chicken breasts.
- Heat olive oil in a non-stick skillet and cook the seasoned chicken breasts for 5-7 minutes on each side until cooked through.
- Let the chicken rest for 5 minutes, then shred into bite-sized pieces.
- In a mixing bowl, whisk together mayonnaise, minced garlic, Parmesan cheese, lemon juice, dried parsley, and a pinch of black pepper.
- Warm flour tortillas in a skillet over low heat for easier assembly.
- Spread garlic sauce over the center of each tortilla. Top with shredded chicken and cheese.
- Add optional toppings as desired.
- Fold the sides of the tortilla over the filling, then roll tightly from the bottom up.
- In the same skillet, cook the wraps seam-side down for about 3-4 minutes on each side until golden brown and crispy.
- Remove cooked wraps and let them rest for a minute before slicing in half and serving warm.
Leave a Reply