
On a chilly autumn afternoon, the kitchen fills with the warming scent of cinnamon and baked apples—just the kind of embrace we all crave. With my Apple Crisp recipe, you’ll discover the joy of preparing a classic dessert that is not only incredibly easy to whip up but also a true crowd-pleaser. Combining tender, spiced apple filling with a golden, crunchy oat topping, this dish is perfect for family gatherings or cozy nights in. Plus, it’s so comforting that it’ll melt away any cravings for takeout! Have you ever felt the simple happiness that comes from sharing a homemade dessert? Let's dive into this delightful treat together.
Why is Apple Crisp a Must-Make Dessert?
Comforting, Cozy Flavors: Nothing says autumn like the soft, spiced apple filling nestled beneath a crunchy oat topping.
Easy to Prepare: With just a handful of ingredients, you can have this delightful dessert baking in no time.
Versatile Variations: Try using different apple varieties or adding nuts to cater to your family’s taste buds.
Crowd-Pleaser: Ideal for gatherings, this dish brings everyone together over the comforting warmth of home-cooked goodness.
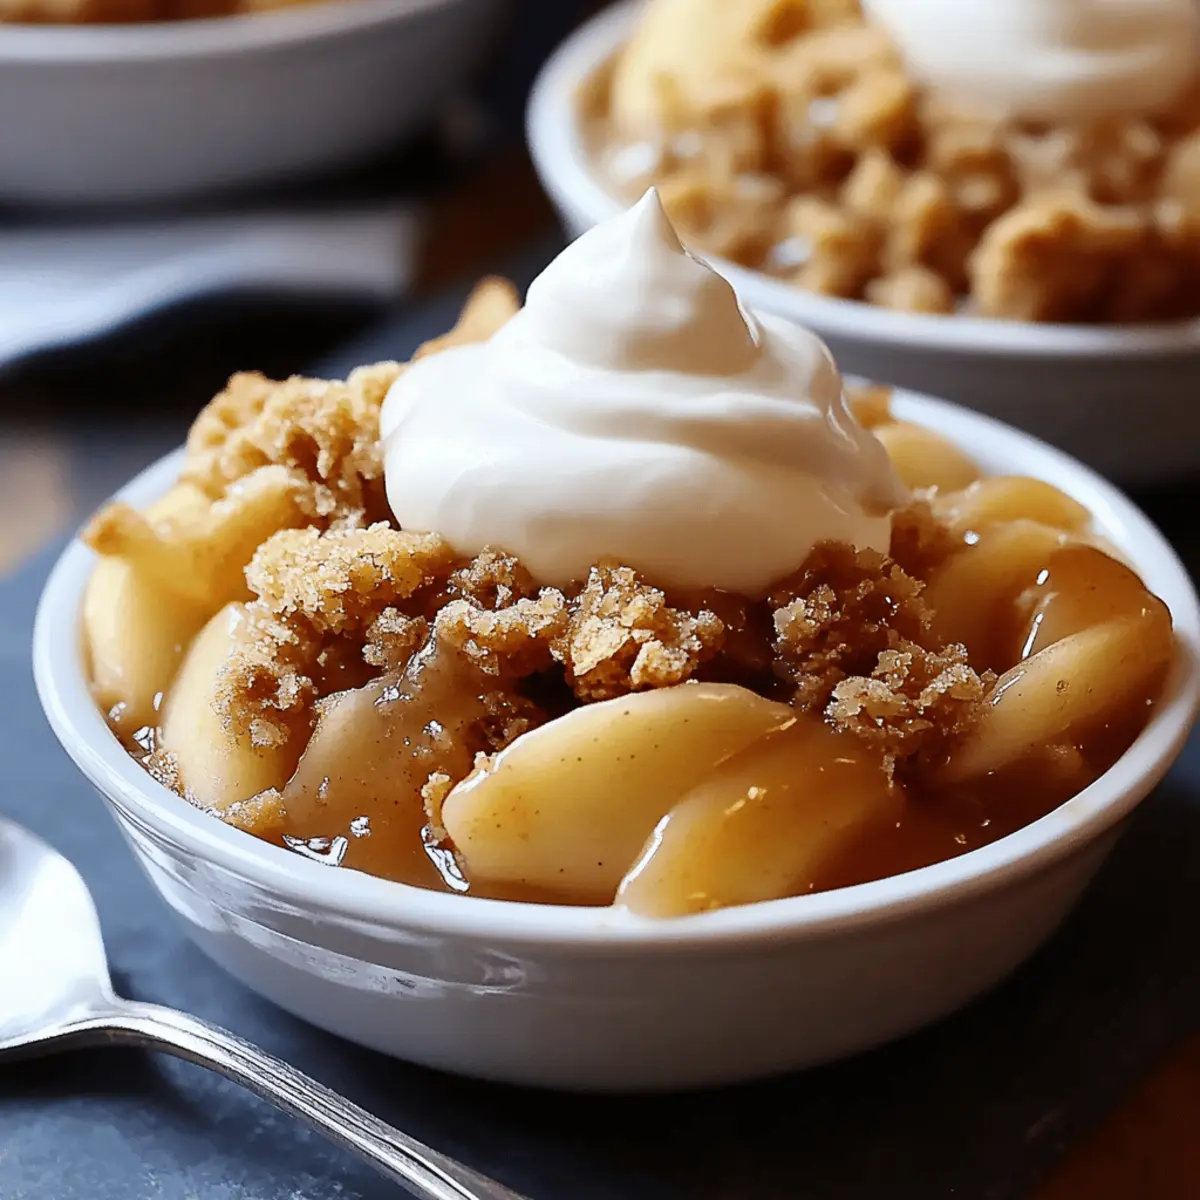
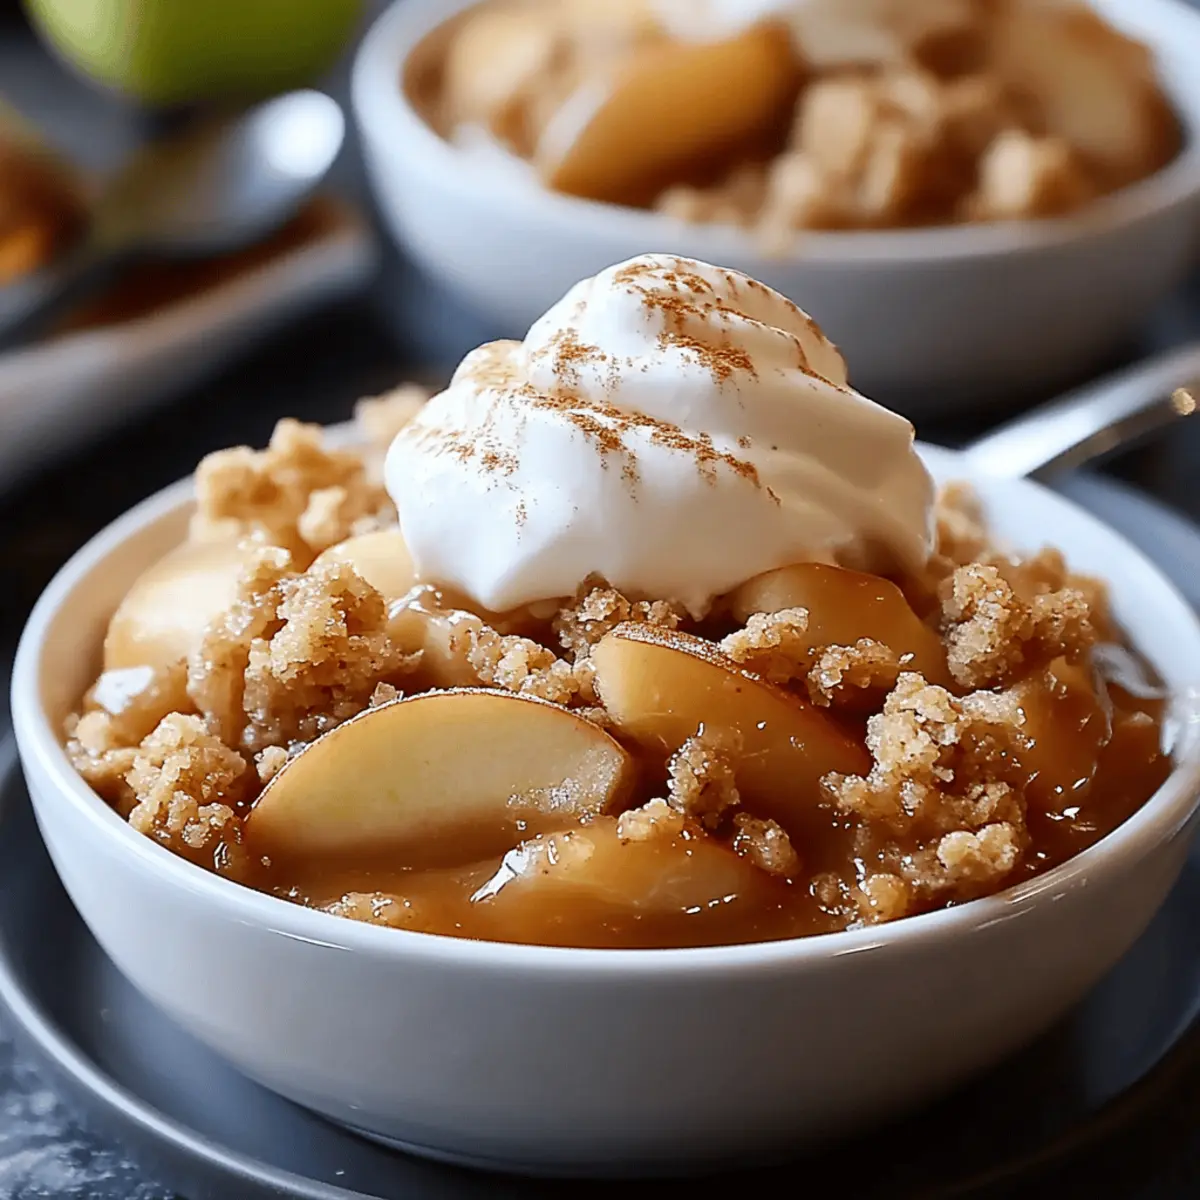
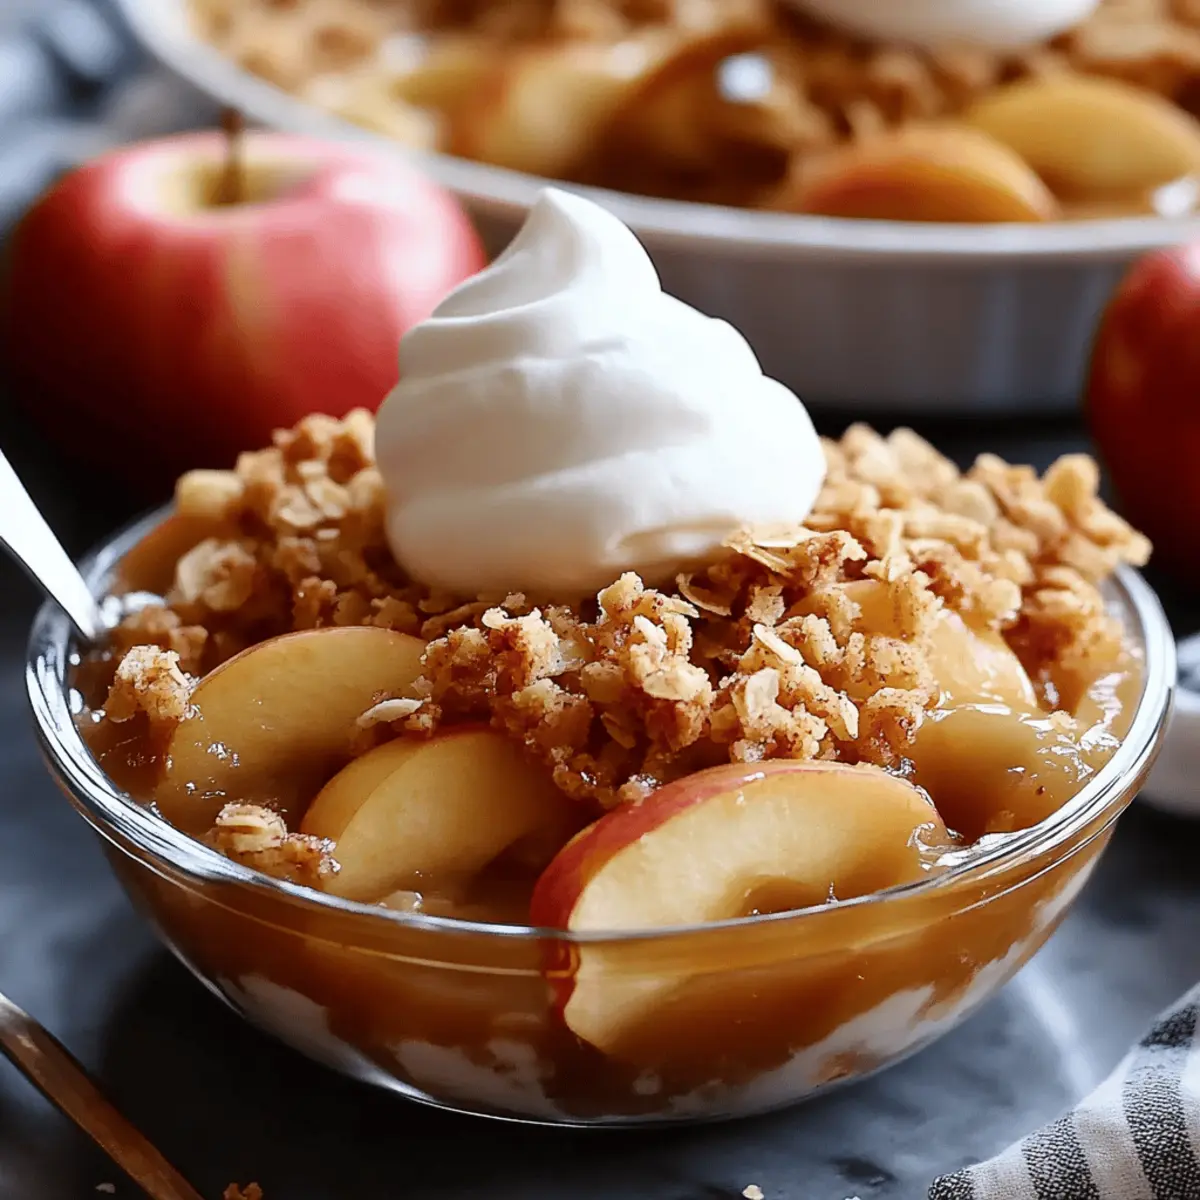
Perfect Serving Suggestion: Serve warm, richly topped with ice cream or whipped cream for that extra touch of indulgence. If you’re up for exploring more classic desserts, check out my easy chocolate chip cookie recipe to satisfy your sweet tooth!
Apple Crisp Ingredients
For the Apple Filling
• Apples (6-8 medium) – Provides the sweet and tart base; Honeycrisp, Granny Smith, or Fuji work best.
• Granulated Sugar (½ cup) – Adds sweetness to the apple filling.
• Brown Sugar (¼ cup, packed) – Enhances flavor depth with a hint of caramel.
• All-Purpose Flour (2 tbsp) – Acts as a thickening agent for the filling.
• Ground Cinnamon (1 tsp) – Adds warmth and spice to the mixture.
• Ground Nutmeg (¼ tsp) – Provides aromatic flavor; use more if desired.
• Lemon Juice (1 tbsp) – Brightens the filling and prevents browning of apples.
For the Crisp Topping
• Unsalted Butter (½ cup very cold) – Adds richness; keep it very cold for a crispy topping.
• Old-Fashioned Rolled Oats (½ cup) – Contributes texture and chewiness to the topping.
• All-Purpose Flour (1 cup) – Binds the topping ingredients together.
• Granulated Sugar (¼ cup) – Sweetens the topping.
• Ground Cinnamon (1 tsp) – Infuses the topping with an inviting flavor.
• Salt (½ tsp) – Balances sweetness and enhances all flavors.
Whether you're making this classic Apple Crisp for a family gathering or a cozy evening at home, these ingredients will create a dessert that perfectly embodies autumn comfort!
Step-by-Step Instructions for Apple Crisp
Step 1: Preheat the Oven
Begin by preheating your oven to 375°F (190°C). While the oven heats up, grab a 9x13 inch baking dish and lightly grease it with butter or non-stick spray. This crucial first step ensures your Apple Crisp will bake evenly and develop a golden, crunchy topping that contrasts beautifully with the tender apple filling.
Step 2: Prepare the Apples
Next, peel, core, and slice your apples into ¼ to ½ inch thick pieces. Place the apple slices in a large mixing bowl, then drizzle with 1 tablespoon of lemon juice, tossing gently to coat. This not only adds brightness but also prevents the apples from browning. The apples will give your Apple Crisp that delightful tender filling.
Step 3: Mix the Apple Filling
In a separate bowl, combine the granulated sugar, brown sugar, 2 tablespoons of flour, and 1 teaspoon of ground cinnamon. For added warmth, you can include ¼ teaspoon of nutmeg and a hint of ground cloves—if desired. Sprinkle this mixture over the prepared apples, tossing them gently until all of the slices are nicely coated. Scatter small pieces of 2 tablespoons of butter over the apple mixture, then transfer it into the greased baking dish.
Step 4: Prepare the Crisp Topping
For the topping, mix together 1 cup of all-purpose flour, ½ cup of rolled oats, ¼ cup of granulated sugar, 1 teaspoon of cinnamon, and ½ teaspoon of salt in a medium bowl. Cut in ½ cup of very cold butter using a pastry cutter or your fingertips until the mixture resembles coarse crumbs. This step is key for achieving that crispy texture we love in an Apple Crisp.
Step 5: Assemble the Crisp
Evenly spread the crispy topping over the apple filling in the baking dish, ensuring the apples are completely covered. Avoid pressing down; you want to maintain that airy, crunchy texture. The contrast between the juicy apple filling and the golden topping will make your Apple Crisp simply irresistible.
Step 6: Bake
Place the assembled Apple Crisp in the preheated oven and bake for 45 to 60 minutes. Check for doneness when the topping is golden brown and the filling is bubbling around the edges. If you notice the topping browning too quickly, tent the dish with foil to prevent it from burning while the apples finish cooking.
Step 7: Cool
Once baked, remove the Apple Crisp from the oven and let it cool on a wire rack for 15 to 20 minutes. This resting time allows the filling to set slightly and the flavors to meld beautifully. The delightful aroma filling your kitchen during this time will keep everyone eagerly anticipating a taste!
Step 8: Serve
Finally, serve your warm Apple Crisp as a comforting dessert. You can enhance this classic dish with a scoop of vanilla bean ice cream, a dollop of whipped cream, or a drizzle of salted caramel sauce for an indulgent treat that will surely impress family and friends. Enjoy the warmth and togetherness that comes from sharing this hearty dessert!
Apple Crisp Variations & Substitutions
Feel free to get creative with your Apple Crisp and explore delightful twists that suit your taste!
- Gluten-Free: Replace all-purpose flour with a gluten-free flour blend for a delicious, gluten-free version to enjoy.
- Nutty Crunch: Add ½ cup of chopped pecans or walnuts to the topping for that extra satisfying crunch. It's a small change, but the flavor boost is delightful!
- Dairy-Free: Substitute coconut oil or vegan butter for the butter in both the filling and topping for a dairy-free delight. Your Apple Crisp will still be rich and fulfilling!
- Brown Sugar Boost: Swap out the granulated sugar with an extra ¼ cup of brown sugar in the filling for a more caramel-like flavor. This sweet shift enhances both flavor and texture perfectly.
- Fruit Mix-In: Incorporate berries, pears, or peaches with the apples for additional layers of flavor and color. Each bite will take you on a fruity adventure!
- Spicy Twist: Add a pinch of cayenne pepper to the topping for a subtle kick that balances the sweetness beautifully. Heat lovers will appreciate this unexpected delight!
- Herbal Hint: Infuse fresh herbs like rosemary or thyme in the apple mixture for an intriguing depth of flavor. Just a tiny sprinkle makes a big impact!
- Maple Syrup Drizzle: Drizzle pure maple syrup over the apple filling before adding the topping for a rich flavor that compliments the spices exceptionally well. No one will be able to resist!
Explore these variations and let your Apple Crisp reflect your own family’s taste preferences, making it even more special! Don’t forget to serve your creation with a scoop of vanilla ice cream or a dollop of whipped cream as an ultimate treat! And if you’d like to try more delightful desserts, take a peek at my mouthwatering easy chocolate chip cookie recipe.
Expert Tips for Perfect Apple Crisp
-
Choose Your Apples: Use a mix of sweet and tart apples like Honeycrisp and Granny Smith for a balanced flavor in your Apple Crisp.
-
Cold Butter is Key: Ensure your butter is very cold when making the topping. This helps achieve a crunchy texture; if it softens, refrigerate briefly.
-
Avoid Overmixing: When combining your topping ingredients, mix until just crumbly. Overmixing can lead to a dense topping instead of a light, crispy one.
-
Tent with Foil: If the topping browns too quickly during baking, tent the dish with foil to prevent burning while allowing the apples to cook through.
-
Cooling Time Matters: Let your Apple Crisp cool for 15-20 minutes before serving. This resting period helps set the filling and allows flavors to meld beautifully.
What to Serve with The Best Apple Crisp Recipe
On those crisp autumn evenings, enhancing your Apple Crisp with delightful side dishes can transform it into a full family feast.
- Vanilla Bean Ice Cream: The creaminess of ice cream melts beautifully over warm apple filling, adding a luxurious touch to each bite.
- Fresh Whipped Cream: Light and airy, this simple topping is perfect for balancing the warmth and spice of the Apple Crisp. A sprinkle of cinnamon in the cream offers an extra layer of flavor.
- Salted Caramel Sauce: Drizzling this sweet and savory sauce over your dessert takes it to the next level, enhancing the rich flavors of the apples with every spoonful.
- Creamy Mashed Potatoes: The buttery softness of mashed potatoes contrasts with the crisp topping, making for an unexpected yet delightful pair.
- Warm Spiced Cider: Sipping on a glass of warm, spiced cider while enjoying your Apple Crisp brings together the essence of fall in every aspect.
- Roasted Brussels Sprouts: The slight bitterness and crunch of roasted Brussels sprouts create an interesting textural complement, contrasting with the sweetness of the dessert.
- Cranberry Sauce: A tangy cranberry sauce adds a burst of tartness, refreshing the palate and enhancing the autumn theme.
- Pecan Tart: This nutty dessert mirrors the warmth of your Apple Crisp and can be served alongside for those who crave extra indulgence.
- Hot Chocolate: Cozying up with a cup of rich hot chocolate brings a sweet warmth, perfect for cold evenings and an extra treat when served with Apple Crisp.
How to Store and Freeze Apple Crisp
Fridge: Store any leftover Apple Crisp in an airtight container for up to 3-4 days. This keeps the flavors fresh and the topping somewhat crispy.
Freezer: You can freeze the Apple Crisp before baking for up to 3 months. Wrap it tightly in plastic wrap and then foil to prevent freezer burn.
Reheating: To reheat, bake from frozen at 350°F (175°C) for about 45-60 minutes, or until heated through. For leftovers, warm in the microwave or oven until just warmed, to restore some crispiness.
Room Temperature: If serving immediately, let the Apple Crisp cool for 15-20 minutes before cutting and serving. This helps the filling set while maintaining the topping's crunch.
Make Ahead Options
Preparing the Apple Crisp ahead of time is a wonderful way to save precious moments in the kitchen, especially on busy weeknights. You can slice and toss the apples with lemon juice up to 24 hours in advance, storing them in an airtight container in the refrigerator to prevent browning. Additionally, you can prepare the crisp topping (mixing the dry ingredients and cutting in the cold butter) and refrigerate it in a separate container for up to 3 days. When you're ready to bake, simply combine the apple filling and the topping in your baking dish, then pop it in the oven as directed. With these easy make-ahead options, you'll have a hot, comforting dessert that tastes just as delightful as if it were made fresh that day!

The Best Apple Crisp Recipe FAQs
What type of apples should I use for the best flavor in my Apple Crisp?
Absolutely! For the best results, I recommend using a mix of sweet and tart apples. Honeycrisp and Granny Smith are fantastic choices, providing a lovely balance of flavor. Using 6-8 medium apples helps create that delightful tender filling.
How should I store leftover Apple Crisp?
You can store any leftover Apple Crisp in an airtight container in the refrigerator for up to 3-4 days. This keeps the flavors fresh and allows you to enjoy your homemade dessert without losing too much crispiness.
Can I freeze Apple Crisp and how?
Yes, you can freeze Apple Crisp! Before baking, wrap it tightly in plastic wrap and then in aluminum foil to prevent freezer burn. It can stay in the freezer for up to 3 months. When you're ready to bake it, no need to thaw—just pop it into a preheated oven at 350°F (175°C) for about 45-60 minutes.
What should I do if my topping becomes too brown before the apples are cooked?
If you notice the topping browning too quickly, don’t worry! Simply tent the baking dish with aluminum foil. This will protect the topping from burning while the apples continue to cook and become tender.
Is this Apple Crisp recipe suitable for people with nut allergies?
Yes, it is! The core ingredients of this Apple Crisp recipe are nut-free, making it a safe choice for those with nut allergies. However, if you're serving guests, do check if they have any other dietary restrictions to ensure everyone can enjoy this delightful dessert without worry.
Irresistibly Easy Apple Crisp for Cozy Autumn Nights
Ingredients
Equipment
Method
- Preheat your oven to 375°F (190°C) and prepare a 9x13 inch baking dish.
- Peel, core, and slice apples into thick pieces, then coat with lemon juice.
- Combine sugars, flour, and spices in a bowl, then mix with apples and add butter.
- Mix topping ingredients until crumbly, then cut in cold butter until resembling coarse crumbs.
- Spread topping over apple mixture without pressing down.
- Bake for 45 to 60 minutes until topping is golden and filling bubbles.
- Cool for 15 to 20 minutes on a wire rack.
- Serve warm, optionally with ice cream or whipped cream.


Leave a Reply